lecture one
agenda
- introductions
- course information & administration
- setting up your webspace
- your first web page
- homework
- readings
introductions
- instructor: Richard Hart
- email: see sidebar
- web site: you're soaking in it
- all about you...
- your name
- your background
- what is your interest in the subject?
- what do you hope to achieve in this course? Be specific!
- do you have any previous experience?
about the course
- objectives:
- provide an overview of web development and design
- impart skills in the use of HTML, CSS, interface design, introductory scripting and advanced mark-up techniques
- provide resources and suggestions to go further
- format:
- some theory, mostly practical, hands on
- in class exercises (no marks)
- 5 homework exercises, 2 assignments, 1 midterm, 1 major project, 1 final exam
- readings:
- mostly from textbook; some suggested readings online
- see weekly selections on readings page
- assignments:
- homework exercises:
- 5 small exercises to be handed in throughout course (20%)
- projects:
- 2 small projects aimed at maintaining some personal pages on your bcitwebdev.com account (10% each)
- one major project - fully-functioning web site (25%)
- see the assignments page for details and due dates
- homework exercises:
- midterm & final exam
- fill-in-the-blanks, short answer, matching, code correction, sample web page for which you will need to write out the code
- based on lecture notes and in-class exercises/handouts
- NOT open book or online...bring a pencil
what you won't learn
- how to be a web "master"
- advanced graphic design
- database integration
- advanced CSS techniques
- Java, or other web programming languages
what you will learn
- how to construct and manage a basic web page/site
- web and internet terminology (keep your eye out for acronyms)
- how to mark-up pages by hand using HTML
- some basic interface design and usability principles
- an introduction to cascading style sheets (CSS) and web scripting concepts
- a solid foundation upon which to base future web development studies
student account setup
Each student will get personal webspace. This space is exclusively yours, with your own username and password. You will need to use a File Transfer Protocol (FTP) client to move your files between the server and your local work station.
- You will create your account in the system one by one
- Be prepared to enter your:
- directory name - your myBCIT name is a good option (what's that?)
- username - does not have to be the same as directory name, but it is recommended
- password - must include one uppercase character, one punctuation character and one digit
- Instructor will have you enter your information to create account
- The account is created immediately
- Your URL will be: http://students.bcitwebdev.com/[your_directory_name]
- Help document (MS Word)
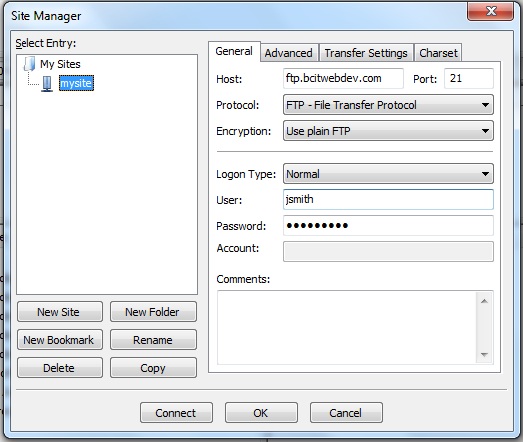
use ftp to connect to your account
- Launch FileZilla from your Start Menu (choose All Programs and locate FileZilla in listing).
- Select File > Site Manager
- Click on New Site in the bottom left corner of the dialogue box. The New Site will appear in the window above; rename it COMP 1850 or mysite or something similar
- Host: ftp.bcitwebdev.com
- Port: 21
- Logon Type: Normal
- User: [your_username] - i.e., the one you just created
- Password: [your_password]
- Account: leave blank
- Click Connect (bottom)
getting started with hypertext markup language (HTML)
- foundation of WWW documents
- co-ordinates the display and layout of all elements: graphics, text, audio, video, etc.
- a system for describing documents: a set of codes which "mark up" an unformatted piece of text telling the "reader" (web browser) how to display the information
- set of codes, commonly referred to as "tags"
- tags tell a browser what to do with a particular piece of information:
- may help to think of most tags as containers (
<strong></strong>), or boxes within which you can place various information - many (not all) tags have attributes, which in turn have values (contained in quotations):
Syntax:<tag attribute="value"> - some tags are able to contain several attribute/value pairings:
Syntax:<tag attribute1="value1" attribute2="value2" attribute3="value3">
basic HTML document tags
Web pages must follow a particular structure. In order to be valid they must include the following document tags:
-
<!doctype>- identifies file as HTML, and the "dialect" of HTML being used-
<!DOCTYPE html>
-
-
<html></html>- tells browser that the file contains HTML-encoded information; reinforced by file extension ".html" or ".shtml" etc.
-
<head></head>- tells the browser important information about the document body
- several things can go into head:
<script>,<style>,<meta>
-
<meta charset="utf-8">- tells the browser to use Unicode for character encoding. Another common character encoding might be ISO-8859-1 (Character encoding for the Latin alphabet).
- note that
<meta>is an "empty" tag – there is no "closing" version (i.e.,</meta>)
-
<title></title>- contained in head section
- displayed in browser window but not in text area
- top level for search engines
- no longer than 64 characters in length
-
<body></body>- contains the content of the document; displayed in text area of browser
- has attributes which help define the appearance of document
saving files
file name conventions
HTML code is written as a text file. When saving, use conventional names for your files to maximize the portability of your code.
DO:
- use alphabetic characters
- use numbers
- use underscores, dashes
- be descriptive
- use an .html extension (for now)
DON'T:
- use spacebar spaces
- use special chars ...!@#$%^&... etc.
- use UPPERCASE characters unless absolutely necessary
saving your work to the H: drive
In addition to the web space we created earlier, each student is assigned BCIT network storage space, you may store your in-class work here. All work performed on lab computers should be saved your personal space (H: drive). When working on any BCIT lab computer, vist the H: drive to access your files.
Connecting to BCIT drives from home:
When away from a lab computer, you can access your personal files remotely, see the BCIT help desk instructions.
If you do your in class work on a personal laptop, you do not need to use the personal files area.
some text formatting tags
- Block-level Element Tags (automatic line breaks):
-
<p></p>- Paragraph -
<h1></h1>- Level one heading (headings have six levels; try them out!) -
<blockquote></blockquote>- Indents text from both left and right margin; used for quoting blocks of text (for all you essay writers) - More on block-level elements
-
- Inline Tags: (no automatic line breaks)
-
<strong></strong>- Bold -
<em></em>- Italicize -
<a></a>- Anchor, used to create hyperlinks (doesn't do anything without attribute/value pairings; can you figure it out?) -
<small></small>- Legal disclaimers etc., displayed in small font size -
<sup></sup>- Superscript; small text above the baseline -
<hr>- Horizontal Rule - More on inline elements
-
- Note: Block-level elements can have inline elements nested within them but not vice versa!
- Empty tags (elements with no content that don't have a closing tag):
-
<br>- Line break -
<meta>- Meta element allows you to add page-specific information like character sets -
<hr>- Horizontal Rule
-
some attribute value pairs
- some tags don't work without attributes and values:
<a></a>,<abbr></abbr>,<img />
- attributes have values that communicate additional information about a tag to the browser:
- references to CSS classes for styling purposes
class="fancy" - a unique ID:
id="navigation"for styling or javascript purposes - more information about the content of the tag:
alt="A picture frame"ortitle="British Columbia Institute of Technology" - a link to another file:
src="http://www.bcitwebdev.com/lectures/one/picture.jpg"orhref="http://www.bcitwebdev.com/css/comp1_main.css" - information about that other file
type="text/css"
- references to CSS classes for styling purposes
- all attributes must have values
- each tag has different allowable attrbutes (for example: the
<abbr>tag cannot use asrcattribute) - tags that don't need attributes can still have optional attributes
make it snazzy
All HTML elements have a default style – ugly. To make things look better, we can apply styles. We'll talk about the mechanics in the weeks to come, but here's how you can add some pizzazz immediately:
- Add the
styleattribute to virtually any element on your page:
<h1 style="value">This is a heading</h1> - In the place of
value, try one of the following:-
color: red;(or pick a colour; note the American spelling of color). -
background-color: yellow; -
border-size: 10px; -
font-size: 58px; -
text-align: center; -
text-decoration: overline; -
padding: 30px;
-
add your "home page" to the course members list in myBCIT
- Login to myBCIT.
- Click the My Courses tab.
- Select the current term and then click on the Web Development and Design I link.
- Locate and click on the Members link in the left hand navigation menu.
- Find your name and click toadd your home page.
- In the Title field, enter something like "My homepage" (without the quotes).
- In the URL field, enter http://students.bcitwebdev.com/[your_directory_name].
- Click Submit.
homework exercise
Build and upload an index page for your bcitwebdev.com account. Include the following:
- Information about you, why you're taking this class, what you hope to learn.
- Examples of paragraphs, headings and bold text.
- Something cool you learned from the first assigned readings.
- Link the page from your myBCIT page as described above.
- Upload your exercise to your account and email your instructor with the following:
...or something like that.To: xxxxxx.xxxxxx@xxxxxxxxxx.com
Subject: COMP 1850 Homework Exercise 1
Body:
"Hi Richard! Here's my first homework exercise: http://students.bcitwebdev.com/your-account-name-that-we-created-today/homework1.html
Cheers!"
Exercise is due before the start of the week two class. Your instructor will not hunt you down to hand this in - no email sent to your instructor = zero marks.